Hanamushi's Doll Adventure Puzzles: Route and Visual Checkpoints
Find the named puzzle scenes, use their visible feedback, and recover the route from Robot Factory through the Bulb Birds.
Match each official puzzle name to the recorded scene. Operate one mechanism at a time, inspect its feedback, and check the equipped outfit before retrying a blocked crossing.
View reference image
On this page
Use the official badge names as a route through Hanamushi’s Doll Adventure, then match each name to the character or mechanism on screen. The October 13 Roblox Master Guides recording supplies a practical chapter order: Tree Monster, Wall Posters, Pom-Pom Girl, House of the Twins, Robot Factory, Nine Eyes, Mushrooms and the Snail, Bug-Catching Bug, and Bulb Birds. The Roblox badge API independently confirms those nine puzzle names. That agreement makes the chapter list useful for recovering a lost route.
This guide concentrates on inspected visual checkpoints in that dated Roblox recording, rather than a firsthand playtest. Match your current puzzle state before following the demonstration; chapter starts can include travel. Read the beginner route first if you have not yet reached the house.
Keep puzzle state separate from clothing state
The recorded route alternates between operating a mechanism, opening the wardrobe, and changing what the doll wears. Those are distinct kinds of progress. A solved mechanism may add a useful piece to the wardrobe, while the next travel obstacle may depend on wearing it. A new item appearing in the book does not mean the doll has already equipped it.
Keep a note with two columns: the scene state you last verified and the outfit you were using there. For the robot section, for example, record whether the machine’s indicator has changed separately from whether the doll is wearing a mechanical torso. This is a concrete recovery technique for the recorded route. It avoids the unhelpful conclusion that the same picture must mean “nothing saved” whenever you revisit a screen.
Robot Factory: read the panel, then check the outfit
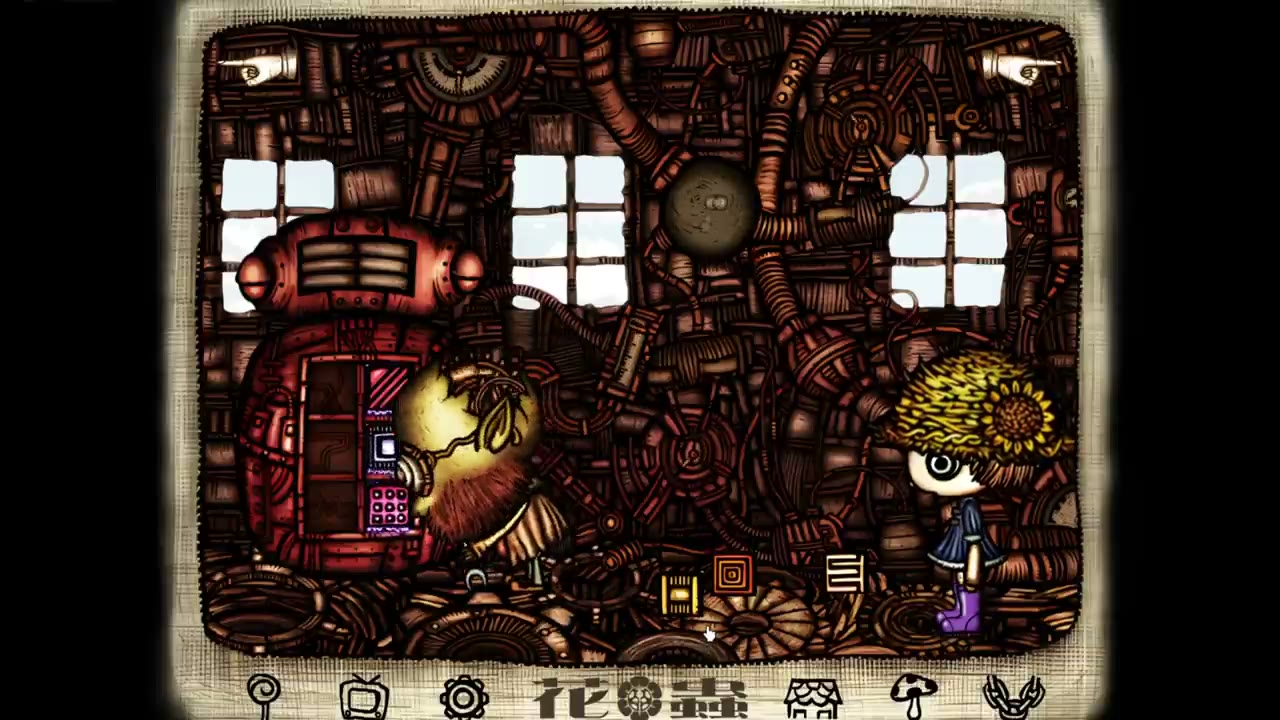
The Robot Factory chapter begins at 5:23 and includes travel before the machine interaction. The factory is recognizable by its windows, pipes, gears, large red robot, and small working character. At 6:45, the inspected frame shows patterned square pieces near the floor and corresponding positions on the robot’s front. Follow the shapes and locations of those pieces rather than treating the scene as an unexplained color-password screen.
Frames at 6:45, 6:50, 6:55, and 7:00 show the panel changing and the robot’s horizontal indicator becoming bright green. That is observable feedback you can compare with your own attempt. Work one placement at a time, watch the indicator, and preserve the arrangement you have already verified. Randomly changing every piece at once makes it much harder to learn which placement helped.
After the factory section, the walkthrough later shows the doll with a mechanical torso being carried by the hovering magnet-shaped creature across the gap. The inspected 10:00 frame makes that connection visible. If you reach the crossing and nothing useful happens, compare your worn torso with that frame before restarting the factory puzzle. Keep the mechanical torso selected while comparing this crossing with the recording.
Nine Eyes: identify the whole panel before copying inputs
Nine Eyes starts at 7:14 in the chapter list. The recorded approach passes roof and travel scenes before reaching the large many-eyed creature. The important visual anchor is the group of large circular eyes, not the smaller companion or an unrelated face elsewhere in the artwork. The official badge description identifies the same nine-eye mystery.
First observe the current eye colors and positions. If an input changes more than the selected eye, note the resulting pattern before making another input. Treat a screenshot or small grid as a state record, rather than assuming the video’s starting pattern must match your own. That recommendation is particularly useful for a visual toggle puzzle, where one remembered wrong click can make a copied sequence appear broken.
Use the linked chapter for a close comparison with the recorded successful route. Compare the whole eye pattern, including eyes changed indirectly by your last input, before continuing the demonstrated route. Once you have passed that section, inspect your collection before continuing, because the later video shows the doll wearing cat-like ears in other scenes.
Mushrooms and the Snail: track the stack, not the scenery
The Mushrooms and the Snail chapter starts at 9:34. It takes place around mushroom-like platforms and a snail beside a small sign. Inspected frames at 10:30, 10:50, 11:10, and 11:30 show the caps changing their arrangement and the snail changing position. Those are the puzzle elements to track. The landscape is visually busy, but the task is not to click every mushroom decoration you can find.
For a stack-transfer puzzle, work out where you want the largest piece to end before moving the small pieces. Use an available platform to free the piece beneath them, and keep a written record of the current arrangement if you pause. Before making another transfer, compare the size order and the platform that needs to remain free for your next move.
The official record identifies this as the snail’s mystery, which helps distinguish it from mushroom scenery encountered during travel. If your next move is rejected, compare cap size and the destination platform before concluding that the interface is unresponsive. Repeatedly issuing the same move without checking the arrangement does not help you locate the mistake.
Bug-Catching Bug: observe the moving interaction
The Bug-Catching Bug starts at 12:11. Its scene includes an insect-like figure among curling stems and a visibly extended tongue during the interaction. It is different from the hovering magnet used at the gap. Confusing those two creatures sends you back to the wrong costume or the wrong chapter.
Watch the target’s movement and the catching animation as one cycle. Make an input, then check whether the intended reaction actually occurred. If you are following the video at reduced speed, pause between attempts rather than repeatedly pressing while its animation is still running. Use the creature’s visible reaction to decide when to begin the next attempt.
After the interaction, check your game’s scene and collection feedback before moving to the next checkpoint. Compare that result with the chapter’s final state if the catching animation alone leaves your progress unclear.
Bulb Birds: separate the cue from your response
The Bulb Birds begins at 13:32. The scene shows a row of hanging birds with bulb-like bodies above the doll. Individual bulbs illuminate during the sequence. The useful distinction is between watching the displayed cue and entering your response. Clicking throughout the display makes it difficult to tell whether a failure came from memory, order, or an extra input.
Number the visible bulbs from left to right in your own note, watch a complete cue, and record the order before responding. If the cue repeats or lengthens, extend the note rather than replacing it with a vague description such as “the bright one.” Keep watching the current cue rather than relying on a remembered sequence from an earlier attempt.
Finish the route, then choose a completion target
The chaptered recording labels a later section Game Clear at 14:42 and Costume Complete at 21:44. Several travel and wardrobe steps occur between those chapter starts and the corresponding end-of-route scenes. Do not interpret 14:42 as a guaranteed finish time or assume every costume has been collected just because you have reached the story’s final sequence.
The costume guide explains that distinction and the official translation conflict in the Game Clear badge. Before leaving this puzzle route, note your last verified badge name, the visible scene, and your equipped pieces. You can then resume a specific blocker instead of repeating the entire opening. If a new update changes a mechanism, keep the named landmark but treat the old demonstration as dated evidence rather than forcing your game to match it.
Step-by-step guide
- Find the correct mechanism
Use the official badge name and the walkthrough chapter to distinguish the intended scene from nearby creatures.
- Observe one state change
Place or select one element, inspect the visible feedback and preserve the state you have already verified.
- Check the outfit before repeating the route
The recorded mechanical torso and magnet crossing show why a solved mechanism and equipped clothing are separate checks.
Quick reference
Useful route checkpoints
| Task | Evidence |
|---|---|
| Robot Factory | Chapter 5:23; panel feedback inspected 6:45–7:00 |
| Nine Eyes | Chapter 7:14; many-eyed creature later in the section |
| Mushrooms and the Snail | Chapter 9:34; stack arrangement and snail movement |
| Bug-Catching Bug | Chapter 12:11; moving catching interaction |
| Bulb Birds | Chapter 13:32; illuminated bulb cues |
Video evidence
Watch creator walkthroughs alongside this guide. Check the recording date before following requirements that may have changed.
Roblox HANAMUSHI'S DOLL ADVENTURE Walkthrough | All Costumes and Badges
Robot Factory through Bulb Birds, with visible mechanism and outfit checkpoints.
ROBLOX - Hanamushi's Doll Adventure - ALL BADGES - [Full Walkthrough]
A separate full route through the exact Roblox place, useful for comparing transitions and badge-oriented progress.
FAQ
What should I check before restarting a puzzle?
Match each official puzzle name to the recorded scene. Operate one mechanism at a time, inspect its feedback, and check the equipped outfit before retrying a blocked crossing.
Are old Hanamushi walkthroughs current Roblox evidence?
Not automatically. This page uses the exact Roblox place and dated recordings; older Flash solutions are not substituted for missing current proof.
Sources
Recheck these links whenever the game version, release status, or strategy changes.
- Official game listing The exact Roblox experience; identity and clothing objective.
- Official badge API Badge IDs, names and descriptions checked October 16, including the Game Clear language conflict.
- Chaptered Roblox gameplay, October 13 Scene and wardrobe evidence from the exact game.
- Second Roblox walkthrough, October 9 Independent dated footage; its title alone is not proof of every pickup.